Hi folks,
Well, it is over. My first craft show is in the books. And I survived! In that respect, it was a complete and total success. If we are judging success on whether or not I sold anything, then…no, it was not a success, for I sold nothing. Not even a pot scrubber! And while I am a little frustrated by that, overall, I’m still pretty pleased, because I actually did a show, I figured out a lot of stuff, I learned some things, and I won’t feel as intimidated by shows going forward. Woo-hoo!
I will admit it also helps that nobody else seemed to be selling much either. There were just no customers at this show. I had some visitors to my booth, but most of the people who came through were other vendors. It was just really slow. Mike stayed with me through the whole show, which was great, because it gave me someone to talk to, and he was able to calm me down when I was ready to leave about 2 hours in and we had only seen about 3 people.
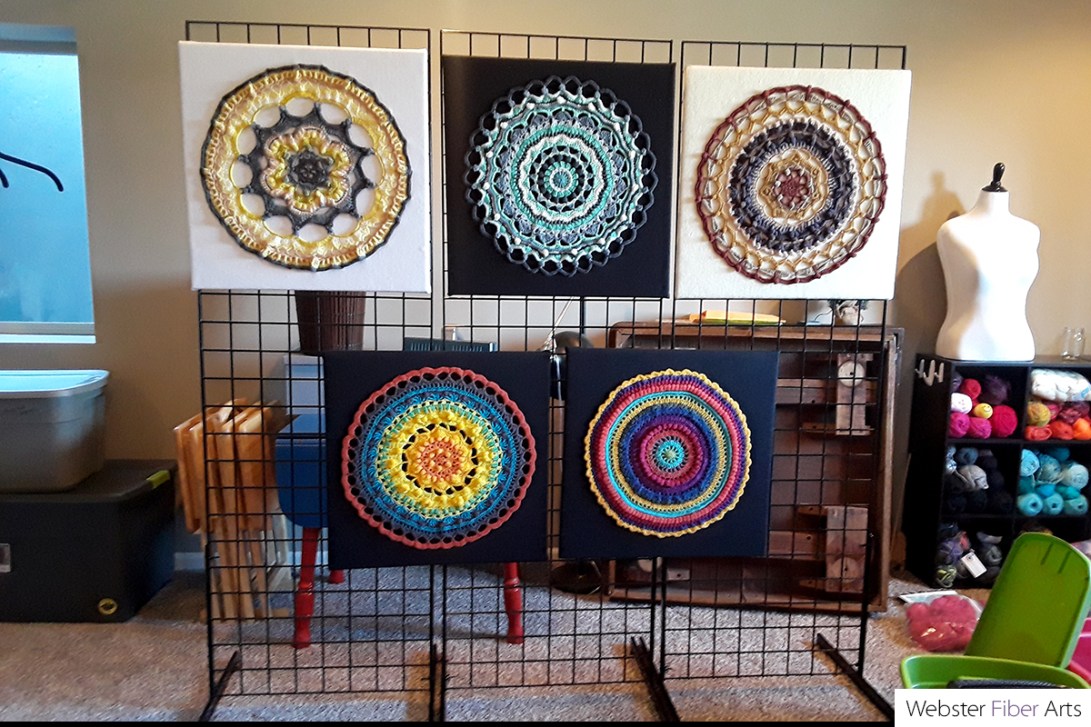
When last I wrote, I said that I was thinking of this as a learning experience, and that is was. I also had a lot of fun getting my booth together. Here’s what it looked like:

Yay!
I’m going to give you a rundown of the things I used in my booth, because I found it really helpful to read about other people’s experiences when I was putting my booth together. Hopefully, this will help someone else! Also, I am not clever enough to monetize my blog, so all of the links to products are just links—I don’t get a cut if you look at them or buy anything.
I had an 8′ x 10′ space to work with, and I laid my space out so it was like you were coming into a little shop. Mike and I sat toward the back of the space, or stood, depending on what we felt like at the time. As I was getting all of my work together, I realized that I had a lot of pieces, and that I tend to favor fall-ish colors, not super awesome for a spring show. I pulled some of my spring-ier pieces out to feature at the front of the booth to draw people in.
My dress form, Bea, came with me to model the shawl. I would have liked to have another form to stand on the other side of the booth, but I wasn’t quite ready to spend money on another Bea, and the less expensive ones I found had patterned coverings that distracted from my scarves. I used a plant stand from our deck to show off a few more pieces, which worked well for this show, but might not work as well outside on a windy day.
For the rest of my scarves and wraps, I bought this clothing rack, which worked really well. It comes apart and goes together easily, so it fit in the car with no problem. This rack comes with wheels, but I didn’t want the rack running all over the place at the show, so I did not attach them.
For hanging my pieces, I used these velvet hangers, which are the nicest hangers I have ever had, and may be the nicest hangers anyone in my family has ever had. They are kind of ridiculous, and were the biggest single expense in my booth, which is definitely ridiculous, but I went with these because my pieces stayed in place on them. I didn’t want to have shawls slipping off of hangers and onto the ground every 5 minutes during the show.
I store my finished pieces rolled up in tubs at home so they don’t crease when they are not in use, but I pre-hung my work on the hangers the night before so set-up would go faster at the event. I draped the hangers in trash bags to protect them from rain.

Tables and chairs were available at this show, but I did not request them because when I registered, I had no idea what my booth would look like. The table in the back of the booth is from our basement. It is a 6′ table that folds in half for transport, which makes it pretty easy to work with. I put all of my cowls on this table. To add some height, I used jewelry displays and wreath holders. I made a simple sign with my name and credit card logos that I put in a sign holder. I think the sign is too small—I’ll go bigger next time.
Under the table I stored the plastic tubs I brought everything in, as well as a tub that had tissue paper and bags for purchases. The table is draped in a white full size sheet. It does not drape to the floor on the right side of the table so I was able to easily access those bags. I used a piece of white duct tape to secure the sheet to the right side.
Idea that I am stealing: a woman across from me selling lip glosses and such had her table on risers, like these. This brought everything closer to eye level for the customers. Such a good idea!

Behind the plant stand were two TV trays. I displayed all of my dishcloths and scrubbers in baskets on those little tables. The trays are not very tall, so that wasn’t great, but they fit the space well. Bonus: we already had them and I didn’t have to buy anything. I draped the two tables with one white twin sheet. The baskets came from Target.
I brought crochet to work on while I was at the show. I always like to see artists making things when I go to shows as a shopper, plus having a hook and yarn in my hands is really comforting to me. I needed that comfort as my anxiety increased at the idea of having to talk to people, and then increase more at the realization that there wasn’t really going to be anyone to talk to (yes, both made me anxious). Here’s what I made:

It’s a sweet little cowl. I finished this before noon, then pulled out a bunch of stitches so I could keep crocheting. Next time, I will bring more yarn and hope I don’t have time to use it.
I printed my own business cards with this Avery stock that I cannot say enough good things about. They are sturdy and the perforations are very fine, so you get a pretty clean edge when you tear the cards apart. I also used this stock for my price tags. I printed on both sides of the paper for these and was amazed that the stock stayed together with two passes through the printer. My advice on these is to print one sheet at a time, even though it is a drag to keep putting in paper, because it prevents paper jams and wonky printing, and to use the highest print setting your printer has (I used “Best Photo”). Yes, you will use more ink, but I think the resulting prints are worth it.
I did a super grown-up thing and bought liability insurance for the show. At least, it felt super grown-up to me. I went through ACT Insurance for this. I could just see myself setting up next to an artist that makes delicate, hand-blown glass pieces and knocking over their display with my clumsiness. Some shows require this insurance, others don’t. My show didn’t, but I was prepared.
I got a Square reader to process credit cards at the event. I signed up for an Etsy card reader, but never heard from them, so Square won. I got the free reader, which is just a swipe to process the card, not the chip reader. I felt okay about this since there are still major retail chains in our area that don’t have functioning chip readers, but for a bigger show, I will probably get the chip reader because I am a rule follower.
I think that is everything. Congratulations if you made it to the end of this post! I hope some of this information was helpful to you folks out there thinking about doing a show. You should definitely do it! Even though the selling didn’t go so well, I got a lot of really nice compliments that boosted my morale. This first show felt like a hill I needed to get over, and now I am ready to take on more.
Until next time,
Annie